什么是SpringBoot?
简化了Spring项目的搭建和开发过程,可以整合其他框架,简单,快速,快变
项目结构:
springboot项目启动后会自动扫描与其在同一目录下的文件夹
创建webapp目录,以及使用jsp
需要添加依赖
<!--jsp页面使用jstl标签 -->
<dependency>
    <groupId>javax.servlet</groupId>
    <artifactId>jstl</artifactId>
</dependency>

<!--用于编译jsp -->
<dependency>
    <groupId>org.apache.tomcat.embed</groupId>
    <artifactId>tomcat-embed-jasper</artifactId>
    <scope>provided</scope>
</dependency>
创建webapp目录应该与Java和resources目录同级
标记为web目录:Modules --> 点击项目下的Web,将webapp路径添加到下图

热部署
需要的依赖:
<!--热部署配置-->
<dependency>
    <groupId>org.springframework.boot</groupId>
     <artifactId>spring-boot-devtools</artifactId>
</dependency>
properties:
#开启热部署
spring.devtools.restart.enabled=true
#设置重启文件目录
spring.devtools.restart.additional-paths=src/main/java
#页面不加载缓存,修改即时生效
spring.thymeleaf.cache=false
idea需要的配置: 

webjars
WebJars可以让大家 以Jar 包的形式来使用前端的各种框架、组件。
WebJars 是将客户端(浏览器)资源(JavaScript,Css等)打成 Jar 包文件,以对资源进行统一依赖管理。WebJars 的
Jar 包部署在 Maven 中央仓库上,可以让我们对前端资源也以jar包的方式进行依赖管理
通过查看mvc的自动配置类可以看到前端资源配置的虚拟路径和映射路径
引入时,在src创建与pom文件中组件名称相同的空文件夹 webjars/artifactId/version
例如 : src/webjars/jquery/3.3.1

所需依赖:
<!--Webjars版本定位工具(前端)-->
<dependency>
    <groupId>org.webjars</groupId>
    <artifactId>webjars-locator-core</artifactId>
</dependency>

<dependency>
    <groupId>org.webjars</groupId>
    <artifactId>jquery</artifactId>
    <version>3.3.1</version>
</dependency>
测试访问路径:http://localhost:8080/webjars/jquery/3.3.1/jquery.js
对应在jsp中引用:
读取配置文件数据
@propertySource : 指定配置文件
@ConfigurationProperties : 指定配置文件中属性的前缀
@Value("${配置文件中的属性}")
配置文件 application.properties
server.port=8080
user.username=zzz
@Component
@ConfigurationProperties(prefix = "user")
@PropertySource(value = "classpath:application.properties")
public class User {

    private String username;

    public String getUsername() {
        return username;
    }

    public void setUsername(String username) {
        System.out.println("通过set方法赋值");
        this.username = username;
    }
@RestController
@RequestMapping("/hello")
public class HelloController {

    @Autowired
    private User user;

    @Value("user.username")
    private String username;

    @GetMapping("/user")
    public User getUser(){
        return user;
    }

    @GetMapping("/username")
    public String getUserName(){
        return user.getUsername();
    }

}
日期格式转换
前台传递后台按照指定格式接收:
方式一:在bean属性上添加注解
@DateTimeFormat(pattern = "")
方式二:在application.properties文件中添加
spring.mvc.date-format=yyyy-MM-dd HH:mm:ss
后台返回给前台json时的data自定义格式字符串:
方式一:在bean属性上添加注解
@JsonFormat(pattern="yyyy-MM-dd HH:mm:ss",timezone="GMT+8")
方式二:在application.properties文件中添加
spring.jackson.time-zone=GMT+8
spring.jackson.date-format=yyyy-MM-dd HH:mm:ss
静态文件
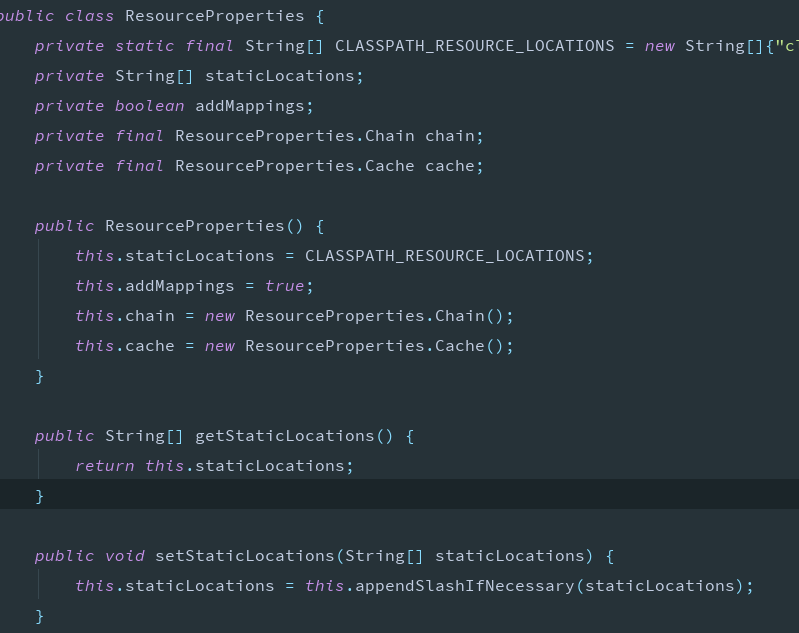
阅读源码可以看到WebMvcAutoConfiguration 类中addResourceHandlers方法

去读ResourceProperties类中的属性

其中将默认的值赋值给了它,共有四个默认值,其优先级跟下图声明顺序一样

这几个文件夹都是在resources文件夹下的
classpath:/META-INF/resources/
classpath:/resources/
classpath:/static/
classpath:/public/
mvc添加该路径方便我们创建webapp目录 还可以添加webapp,在idea中添加该目录需要在project settings -- > models 选中项目的web
有两栏添加第一个提那家web.xml路径,第二个添加webapp路径,如果jsp访问不到 如下配置,别忘记添加依赖

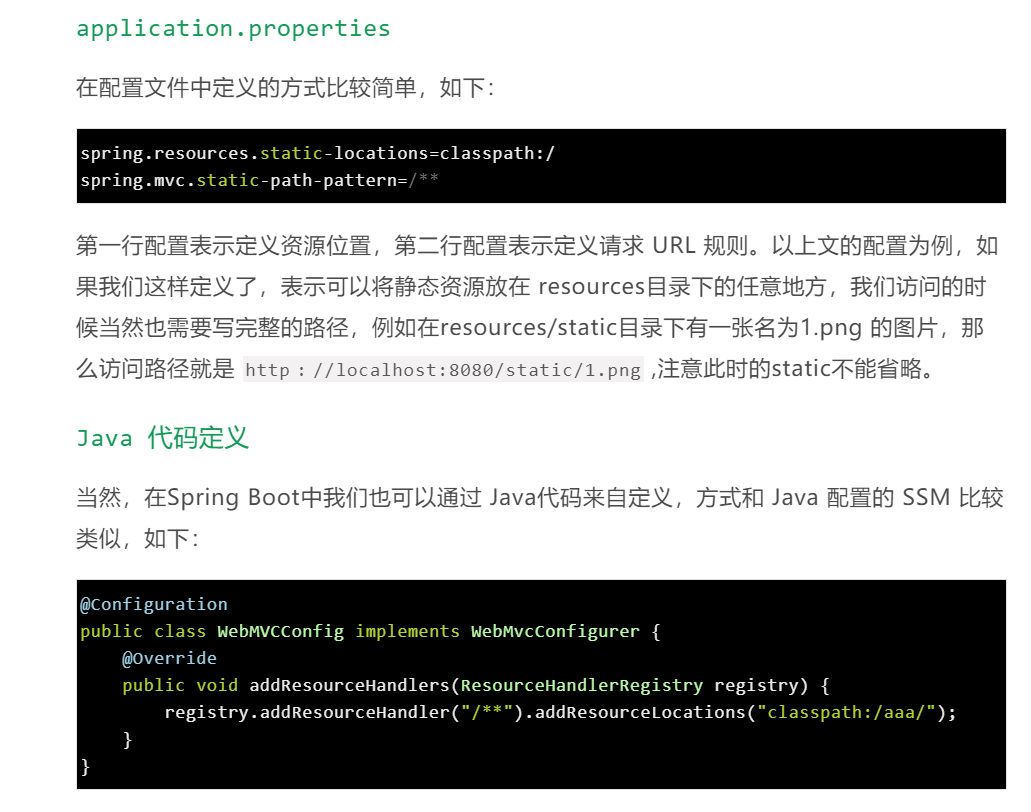
自定义方式:

使用配置文件:
配置文件第一行代表添加一个静态资源文件夹路径,如果没有把默认的配置加上会覆盖默认的设置
同时使用自定义和默认的,用英文逗号隔开即可,前面的优先级高
使用java配置类:
实现WebMvcConfigurer接口重写addResourceHandlers,可以达到相同效果
映射resources下的文件夹或文件以classpath:开头 classpath:/ 代表resources根目录
映射磁盘下的文件以file:开头 ,其中盘符写绝对路径,盘符后的 冒号 可写可不写
例如 : file:D:/temp/upload/
file:D/temp/upload/
使用webapp目录,把js文件放在其根目录下,在webapp根目录和WEB-INF的jsp都可以从所在包直接引用
注意事项:这两种方式都会覆盖其默认配置,也就是说只配置了自己想要的路径,其默认的便会失效
关于前端引入可以在webjars中查看
参考博客
https://www.jianshu.com/p/d40ee98b84b5
https://www.cnblogs.com/sxdcgaq8080/p/7833400.html
江南一点雨
mysql驱动包 8.x 修改时区
spring.datasource.url=jdbc:mysql://localhost:3306/study?useUnicode=true&characterEncoding=utf8&serverTimezone=UTC
使用hikari连接池
导入该启动器,如果不配置其他连接池默认使用hikariCP作为连接池
  <dependency>
      <groupId>org.springframework.boot</groupId>
      <artifactId>spring-boot-starter-jdbc</artifactId>
  </dependency>
application.properties 关于该连接池的配置
#数据源配置
spring.datasource.driver-class-name=com.mysql.jdbc.Driver
spring.datasource.url=jdbc:mysql://localhost:3306/数据库?useUnicode=true&characterEncoding=utf8&serverTimezone=UTC
spring.datasource.username=账号
spring.datasource.password=密码
#连接池配置
#最小空闲连接数
spring.datasource.hikari.minimum-idle=5
#池中最大连接数,包括闲置和使用的连接
spring.datasource.hikari.maximum-pool-size=15
#自动提交从池中返回的连接
spring.datasource.hikari.auto-commit=true
#连接允许在池中闲置的最长时间
spring.datasource.hikari.idle-timeout=30000
#连接池的用户定义名称,主要出现在日志记录
spring.datasource.hikari.pool-name=hikariCP
#此属性控制池中连接的最长生命周期,值0表示无限生命周期,默认1800000即30分钟
spring.datasource.hikari.max-lifetime=1800000
# 数据库连接超时时间,默认30秒,即30000
spring.datasource.hikari.connection-timeout=30000
spring.datasource.hikari.connection-test-query=SELECT 1
#打印sql日志
#mybatis.mapper-locations=classpath:mapper/*.xml
#将数据转换为指定格式+时区返回
#spring.jackson.time-zone=GMT+8
#spring.jackson.date-format=yyyy-MM-dd
#将接收的数据以指定格式存储
#spring.mvc.date-format=yyyy-MM-dd
#开启热部署
spring.devtools.restart.enabled=true
#设置重启文件目录
spring.devtools.restart.additional-paths=src/main/java
#页面热部署
#spring.thymeleaf.cache=false
设置虚拟路径
添加配置类
@Configuration
public class WebMvcConfig implements WebMvcConfigurer {

    @Override
    public void addResourceHandlers(ResourceHandlerRegistry registry) {
//        前面是访问路径 后面是文件实际存在的路径
        registry.addResourceHandler("/z/**").addResourceLocations("file:F://code/");
    }
}
或者在配置文件中添加
#url访问的请求路径
spring.mvc.static-path-pattern=/zz/**
#真实路径
spring.resources.static-locations=file:F://code/